TextWorx comes with it's popup-menu, but it also has a configurable toolbar.
Push (or whatever this is if you may have changed it - if you right-click TextWorx's tray icon, it will tell you the current hotkey) to toggle the Toolbar in and out of view.
The Toolbar locks onto whatever window is active when you summon it. In order to change windows, you have to toggle it off and on again (maybe we'll devise another way someday).
If the toolbar is active (to make it active, click on the toolbar button in the front), you can hover over the buttons to see the button names.

The TextWorx Toolbar has a context menu that you can summon by right-clicking anywhere on the toolbar.
If you have the X button on the end, it will hide the toolbar; or you can just use the menu.
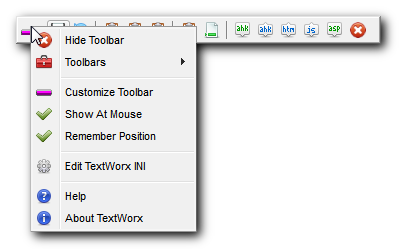
You can customize the Toolbars right from the toolbar itself.
You can choose between which toolbar to show by selecting the one you want from the context menu.
This little submenu is called the .

When this setting is enabled, the toolbar will appear in the same place where you left it last.
If it is disabled, it will appear in the center of the main screen.
This setting is overridden, however by the Show At Mouse setting.
You can toggle this setting in the Toolbar's context menu.
When this setting is enabled, when you summon the toolbar via the hotkey, it will appear where the mouse is.
When it is diabled, it will follow the Remember Position setting.
You can toggle this setting in the Toolbar's context menu.
If the toolbar is active (to make it active, click on the toolbar button in the front), you can hover over the buttons to see the button names.
You can enable or disable this setting.
Since we don't have an Options Panel yet, you can change this setting in the INI file.
If the toolbar is active (to make it active, click on the toolbar button in the front), you can hover over the buttons to see the button names.
The duration of these tooltips can be adjusted with the Tooltip Duration setting.
Since we don't have an Options Panel yet, you can change this setting in the INI file.
Since there is no Options Panel yet, you can still add new toolbars by configuring the INI file.
Customizing the Toolbars with the Config INI file
The text before the = is called the INI Key. The text after the = is called the INI Value.
The name in brackets is called the INI Section.
Lines that start with a semicolon ; are comments and TextWorx ignores them, but you can use them to make notes.
You can modify the default toolbars if you want to.
Sorry, but you cannot add the special menus to the toolbars... (I haven't figured out how to do that)
These are the defaults.
[Toolbars]
default=Default|101|102||125|126|127||105|106|107||104|110||307|308|302|303|304||861
encase=Encasement|103|201|202|203|204|205|207|208|209|210|211||206|861
chars=Chars|102|103|108||115|120|121|122|123|124|201||202|203|204|205|206||208||861
ahk=Autohotkey|105|106|107||120|108||110|201|202||307|308|861
How to add buttons to the Toolbars
To add buttons to your toolbar, simply add the Command ID to the list. The buttons appear in the toolbar in the order they appear in the toolbar's INI entry.
•Buttons must be separated by the pipe | character.
•Two Pipes || creates a Toolbar Separator - you know, that little line on the toolbar (if you accidentally leave a space between them it will be ignored).
•The toolbar's NAME is the INI key name and is what TextWorx uses to refer to the toolbar.
•The toolbar's TITLE is the first parameter in the INI value. This is the name that appears in the context menu's Toolbars Menu.
So, if we want to add the Surround... button to this toolbar, that's Command ID 212, we just add it to the button list. You can put it anywhere you want.
Here is the entry for the default toolbar with our button added:
default=Default|101|102||125|126|127||105|106|107||212|104|110||307|308|302|303|304||861
The toolbars that appear in the are in this INI key, separated by a | pipe character.
The order they appear here is the order in which they appear in the .
You can have many toolbars, and can pick and choose which ones appear in the by adding them here. You don't have to use them all if you don't want to.
[Toolbar]
toolbars=default|encase|chars|ahk|test
To add a new toolbar, first create a toolbar in the [Toolbars] section, then add it's NAME to this key.
Here is an example where we add our own toolbar to the others.
[Toolbars]
default=Default|101|102||125|126|127||105|106|107||104|110||307|308|302|303|304||861
encase=Encasement|103|201|202|203|204|205|207|208|209|210|211||206|861
chars=Chars|102|103|108||115|120|121|122|123|124|201||202|203|204|205|206||208||861
ahk=Autohotkey|105|106|107||120|108||110|201|202||307|308|861
mytoolbar=My Toolbar|212|201|114|401|402|403|404||861
Now add mytoolbar to the list so it will appear in the . Make sure the toolbar NAME matches. The TITLE (in [Toolbars]) can be whatever you like.
[Toolbar]
toolbars=default|mytoolbar|encase|chars|ahk|test
Don't forget to add a button for Command ID 861 - it is the button.
You can even change the TITLE of the default toolbars if you like.
If you change their NAME, then you must change in both [Toolbars] and in [Toolbar].
These are the settings you can change yourself in the INI file. (there are others, but they are for TextWorx to change internally)
These settings are in the [Toolbar] section.
toolbarrem 1=enabled; 0=disabled
showatmouse 1=enabled; 0=disabled
showtooltips 1=enabled; 0=disabled
tooltipduration default is 1000. The value is in milliseconds.