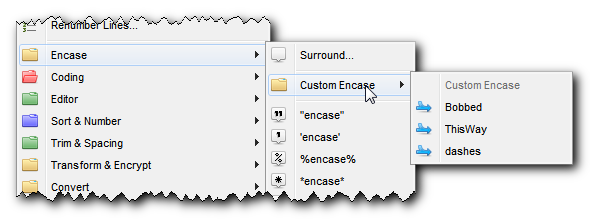
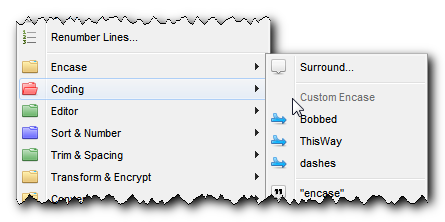
TextWorx has a completely customizable popup menu.
To show the , push the global hotkey, (or whatever this is if you may have changed it - if you right-click TextWorx's tray icon, it will tell you the current hotkey).
This is how to use it:
1.Select some text in your normal text editor.
2.Push the hotkey to summon the .
3.Select a function from the . Be sure to hold the modifier keys for alternate methods.
4.That's it. TextWorx replaces your selected text with the modified text.
Use Modifier Keys to gain functionality:
•Without a modifier, the command will operate on the selected text as a block.
•shift hold this to reverse the command.
•ctrl will operate on each line individually.
•shift+ctrl combine them to reverse the command on each line individually.
The Command List show all of the possible commands along with their modifier keys.
The ... in the Menu titles indicates that the command uses a dialogue box to gather user information - you should hold the modifier key WHEN you push the Accept button in the dialogue.
(scroll down, past this animation for more...)
You can change most of these settings in the , or you can follow the directions for Customizing the Menu with the Config INI file.
Nearly every item on the menu can be customized.
Customizing the Menu with the Config INI file
Open the TextWorx.ini file (you can use the command in the or ). Locate the [Menus] section; it looks like this by default:
After you are finished editing the INI file, you can restart TextWorx from the or with .
[Menus]
mainmenu=default
editor=default
transform=default
trim=default
insert=default
sort=default
coding=default
encase=default
convert=default
webedit=default
markup=default
tools=default
Let's customize the items that appear in the main .
The text before the = is called the INI Key. The text after the = is called the INI Value.
The name in brackets is called the INI Section.
Lines that start with a semicolon ; are comments and TextWorx ignores them, but you can use them to make notes.
The is configured with the mainmenu INI key.
First, comment out the mainmenu line by putting a ; in front of it. That way it is there the next time you want it (this should work for any INI file, by the way).
Then copy and paste this string (it is the expanded default for mainmenu):
mainmenu=800||201|307|302|301||104|901|212|725||encase|coding|editor|sort|trim|transform|convert|webedit|insert|*sar|*date|tools
Now your section should look like this:
[Menus]
;mainmenu=default
mainmenu=800||201|307|302|301||104|901|212|725||encase|coding|editor|sort|trim|transform|convert|webedit|insert|*sar|*date|tools
editor=default
transform=default
trim=default
insert=default
sort=default
coding=default
encase=default
convert=default
webedit=default
markup=default
tools=default
If you set the INI Value for TextWorx's own toolbars to default, then it will use it's own internal menu settings.
However, you can override this by creating your own like we have for the mainmenu above. The only catch to overwriting the default menus is that if we add new functions to the menu, you won't see them and will have to add them manually if you want them.
Now that you have your own custom Main Menu, you are ready to change it to suit your fancy by modifying the mainmenu ini value; just have a look at the Explanation of the Menu Configuration below.
You can also create your own custom submenus.
Explanation of the Menu Configuration
The menu configuration follows a particular specification.
The order of parameters determines the order items appear in the menu.
Everything in the INI Value should be should be composed of these parameters:
parameter |
parameter name |
Explanation |
| |
Parameter Delimiter |
Each parameter for the menu is separated by the pipe: | character. If you leave one out, your item will cause an error and will not display. |
| | |
If you put two pipes in a row with nothing in between, it will create a separator in the menu (any spaces within will be ignored). |
|
NNN |
Command ID |
The numbers are the Function Command IDs. You can swap them out however you like. Look through the list of Commands for the IDs there. |
somename |
Submenu |
•This will load that particular submenu; for example, in mainmenu, you can see encase near the front, causing encase will be loaded as a submenu in that position on the menu. submenu must be a single word composed of just letters. •You can use the built-in menus or you can create your own, willy-nilly. |
icon:NN |
Submenu Icon |
•You can change the icon for the Submenu menu by adding icon:NN where NN is the number of an icon. •Icons are in the textworx.dll, and you need an icon viewer to see them all. But the main folder icons are going to be 11, 12, 13, 14, 15, 16 and 17, which is the toolbox icon. If your icon doesn't exist, the default folder icon will be used. |
'some name' |
Caption |
•Creates a caption within the menu. A Caption is gray text in the menu that you can't click on. It's useful for notating something about the items in the menu. You can put Captions in any menu. •For any menu except mainmenu (which doesn't have one), the very first caption is the title of the menu that shows in the TextWorx Menu. Be sure of the single quote on each side. If you use " or & in this caption, you have to escape them by doubling them. Hence: '""In Quotes""' and 'Do this && This' |
100@special |
Certain Special Menus have Custom Items (See Special Menus Table below). You can put these anywhere in your TextWorx Menu. The number in front, such as the 100 or 101 is the number of your entry from the Special section, and the name after the @ sign is the name of the special section. So, if you want the first entry from the SnipClip section, it would be 100@snipclip and you can place that anywhere in the menus section. For example, if you wanted custom items in the main menu: mainmenu=866||403|404|402||104||*snippets|*snipclip||103@snipclip|103@snippets|107@snipclip|100 |
|
*special |
Special Submenu |
These are Special Menus that TextWorx does special things with. You cannot create your own special menus, but you can add or move them to any other menu.
|
*special* |
Special Menu Embedded |
By adding the star * at both ends when designating a Special Menu, you can force a Special Menu's contents into it's parent menu, thereby preventing the normal Submenu's folder. This works for all the Special Menus except for the Date Menu. It's not useful for long Special Menus, but can be handy for short ones. If you look at the defaults for the Insert Menu, you will see we have done this by default with the Scrib Menu. If we wanted the Scrib Menu to show in it's own folder, we would leave out the second *.
|
default |
Default Menu Setting |
For the built-in Default Menus, if you use this as it's single parameter, you can use the defaults for those menus. This doesn't work for menus that you create, however. |
Special Menus are menus that TextWorx displays with special processing. You cannot create your own Special Menus, but you can add or move them to any other menu.
INI Key |
Menu Title |
Put Anywhere |
Explanation |
*glyphs |
Glyphs |
|
User-created glyphs configured in the [Glyphs] section |
*snippets |
Snippets |
|
Custom text inserts configured in the [Snippets] section. By default it is added to the Insert Menu. |
*scrib |
AdScribere |
User-created adscribere menu built from ini files in TextWorx's /appdire/adsbribere folder. By default it is added to the Insert Menu as Special Menu Items. |
|
*encase |
Encase |
|
User-created encasing configured in the [Encase] section |
*webedit |
Custom Tags |
|
User-created webedit tags in the [WebEdit] section |
*snipclip |
|
User-created snippets with token replacement, configured in [SnipClip] section |
|
*sar |
Search & Replace |
Search & Replace Menu built from ini files in TextWorx's /appdir/permutare folder |
|
*date |
Date & Time |
Date Menu (has special processing, so it can't be modified, but can be placed where you want) |
|
*tools |
Extra Tools |
User-created tools configured in the [Tools] section |
If you set the INI Value for TextWorx's own toolbars to default, then it will use it's own internal menu settings.
However, you can override this by creating your own like we have for the mainmenu above. The only catch to overwriting the default menus is that if we add new functions to the menu, you won't see them and will have to add them manually if you want them.
Although you can do this, a better thing to do is to leave the other menus set to default and just remove the default menu from mainmenu and add your own.
INI Key |
Menu Title |
INI Value |
mainmenu |
Main Menu |
800|866||201|307|302|301||104|901|212|725||encase|coding|editor|sort|trim|transform|convert|webedit|markup|insert|*sar|*date|tools||857|859 |
editor |
Editor |
'Editor'|icon:14|101|102|103|104|114||105|106|107||108|110||113|115 |
transform |
Transform & Encrypt |
'Transform && Encrypt'|'Cyphers'|710|711|712|726|727|728|732||'Encryption'|730|731|408|405 |
trim |
Trim & Spacing |
'Trim && Spacing'|icon:14|'White Space'|701|702|703||704|705|708||706|709|713|714||'Lines'|111|112|116|117|118|729||119 |
insert |
Insert |
'Insert'|606|607|608|609|604|605|738|*snipclip|*scrib|*custom|*glyphs |
sort |
Sort & Number |
'Sort && Number'|icon:13|501|503|502|733||732|724|725||722|715|720|721 |
coding |
Coding |
'Coding'|icon:12|'Code Tags'|304|306|307|310|311|312||'Comment'|302|301|303|308|309|305|313||212 |
encase |
Encase |
'Encase'|212||*encase*||201|202|208|207|209|203|205|206|204|210|211 |
convert |
Convert |
'Convert'|'Sentences'|401|402|403|404||'Numbers'|405|408|409|415|416||'Varia'|410|411|412|413 |
webedit |
WebEdit |
'WebEdit'|709|302|408||901|912|911||902|916|915|920|904|903|919|917|918|910|914|913||905|906|907|908|909|*webedit |
markup |
Markup |
'Markup'|620|621|634||631|622||629|630||624|632|502|724|725||623|633||625|626|627|628||641|642|643|644|645|646 |
tools |
Tools & Options |
'Tools && Options'|icon:17|850|851|114|853|852||854|855||*tools||857|856|858|860 |
You can create as many submenus as you like (as far as I can tell). Here's how:
1.Add your menu to the [Menus] ini section.
2.Make sure to give it a unique ini key name.
3.Make sure to give it a title - that's the first parameter enclosed in single quotes: 'My Menu' in the example below.
4.Don't leave out the pipe | characters that separate the parameters.
5.Remember that regular and your own custom menus do not have quotes or stars.
Here we will add a new line to create a new submenu.
mymenu='My Menu'|icon:12|201|604|607|'Some Caption'|*tools|*custom
Then we add mymenu to the mainmenu.
You can see we've also added myothermenu, and moved the encase and coding menus out of the Main Menu into this one.
We've also added the tokens menu to the Main Menu (by default it is in the Insert Menu)
[Menus]
;mainmenu=default
mainmenu=800||mymenu|myothermenu||201|307|302|301||104|901|212|725||editor|sort|trim|transform|convert|webedit|*snipclip|insert|*sar|*date|tools
editor=default
transform=default
trim=default
insert=default
sort=default
coding=default
encase=default
convert=default
webedit=default
markup=default
tools=default
mymenu='My Menu'|icon:12|201|607|604||*tools|*custom
myothermenu='My Other Menu'|icon:13|701|724|731|encase|coding