TextWorx can insert text snippets; we call the Text Inserts.
There are several ways to have custom text inserts.
• Single-line custom text snippets
• Custom submenus full of Multi-line custom text snippets (adscribere in Latin means to write on, which is like insert text into)
• Insert special characters
All three menus appear by default in the (you can change this by customizing the ).
This menu allows you to insert custom one-line text snippets.
With this menu, you can insert special characters into your text.
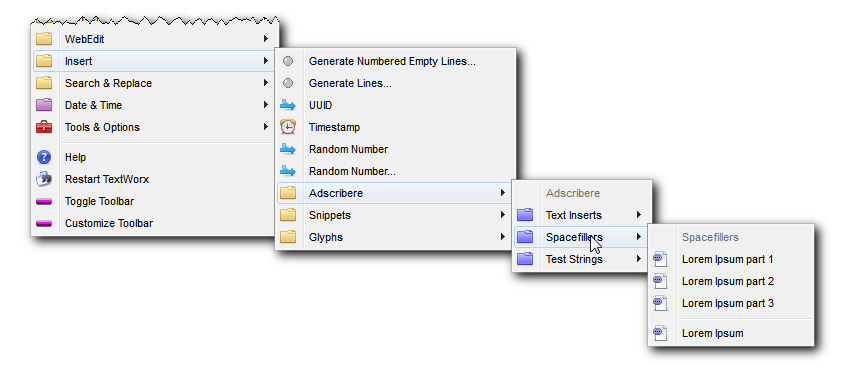
This menu allows you to create submenus of organized, multi-line text snippets.
You can see in our screenshot, that we have created three Adscribere submenus, each with it's own contents. The submenus all do the same thing - they insert text snippets, but the way that the menu system works allows you to create your own submenus to better organize yourself.
Until we fix it, TextWorx ignores blank lines in the file. It respects multiple lines, but ignores blank ones. Go ahead and put your empty lines though, so that when we fix it, it will work.
Configuring Adscribere via the TextWorx INI file
The text before the = is called the INI Key. The text after the = is called the INI Value.
The name in [brackets] is called the INI Section.
Lines that start with a semicolon ; are comments and TextWorx ignores them, but you can use them to make notes.
is configured by creating an INI file for each function, and these files must be placed in the adscribere directory in the TextWorx application folder (similar to the Search And Replace configuration)
You can change the name and location of this folder in the INI file - you would place there a full path to whatever other folder you wish to use. The default folder is called scribdir, and it comes with TextWorx.
In textworx.ini:
[Preferences]
scribdir=permutare
Now, in the adscribere directory, you would create an ini file (you can name it whatever you like), that looks like this:
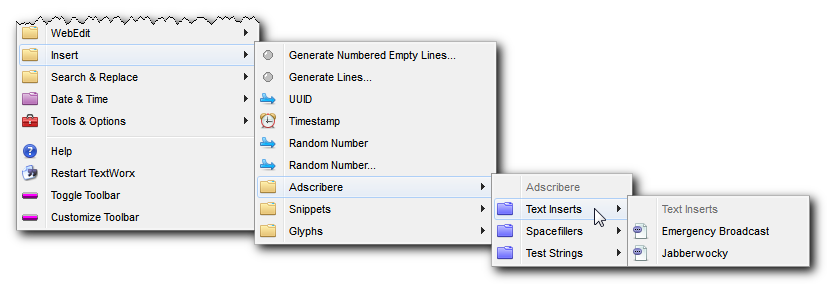
This is the contents of inserts.ini in the adscribere directory.
This ini file creates its own menu as the menu in this screenshot.
[settings]
title=Text Inserts
maxcustom=10
100=Emergency Broadcast|emergency
101=Jabberwocky|jabberwocky
[emergency]
THIS IS A TEST OF THE EMERGENCY BROADCAST SYSTEM.
REPEAT: THIS IS ONLY A TEST.
If this had been an actual emergency, the Attention Signal you just heard would have been followed by official information, news or instructions.
[jabberwocky]
Jabberwocky
By Lewis Carroll
’Twas brillig, and the slithy toves
Did gyre and gimble in the wabe:
All mimsy were the borogoves,
And the mome raths outgrabe.
Configuration of the [settings] section:
•title The TITLE of the menu
•maxcustom The total number of items to display in the menu. The numbers must start at 100, and their order determines the order of the items in the menu.
Each of the numbered keys in [settings] has two parameters
•parameter1 The Title of the text insert - this is the TITLE that appears in this menu
•parameter2 The NAME of the text insert. This is the handle by which TextWorx refers to the snippet. In order for it to show in the menu, this NAME must be in the numbered entries in the [settings] section above.
[sections] Each section should be the NAME from one of the numbered entries in the [settings] section. The contents of the section will be your multi-line snippet.
Summary
•You can have as many menus as you like - a menu is built from each ini file in the adscribere directory.
•You can have as many [sections] as you like, which is the same as having as many multi-line snippets as you like. Each snippet goes in its own [section].
•You can pick and choose which ones you want in the menu by adding their NAMES to the numbered INI keys in the [settings] section of that ini file.
•You can use ; anywhere in the text block without it being recognized as a comment.
Adding Snippets and Glyphs via TextWorx INI file
The text before the = is called the INI Key. The text after the = is called the INI Value.
The name in [brackets] is called the INI Section.
The [Snippets] and [Glpyhs] sections work the same way.
•Set the maxcustom item to be the number of items you wish to show in the menu - it's okay to go over the number by a few counts. In other words, if there are only 10 items, it's okay to set maxcustom to 15. But if you set it to 8, the other to items won't show.
•For your inserts, the INI Key should be a number starting at 100. This number determines the order of the items when they show in the menu.
•The INI value has two parameters separated by a | pipe character.
•Parameter 1 is the title of your snippet or glyph - it can be whatever you want (except that you can't use a semicolon ; character, because that turns the line into a comment in the INI file.
•Parameter 2 is your snippet or, for glyphs, it will be a character code.
[Snippets]
maxcustom=15
100=My Title|Here is a text snippet that I like.
101=Jabber|Twas brilig and the slithy toves
102=DC Site|http://www.donationcoder.com
[Glyphs]
maxcustom=11
100=copyright|0169
101=reg trademark|0174
102=plus-minus|0177
103=trademark|0153
104=separator
105=bullet|0149
106=cross|0134
107=separator
108=oe|0156
109=OE|0140
110=PHI|0x0398
TextWorx will work with Unicode characters, but beware: not every text editor or text area will accept Unicode characters, and not every font has every character.
Maybe I'll fix this someday, but right now, you cannot use the glyph itself as the TITLE of the glyph entry - you have use a textual TITLE (or it messes up the menu)
If you are adding glyphs, you need to put their character code as the second parameter. You can use the 128 Charmap command to launch the Windows Charmap program (or run charmap from Windows RUN command). You can use either their ANSI character code, or a UNICODE character code. Charmap will give you the UNICODE code in its statusbar. If using a UNICODE code, the number should be prefixed with 0x or U+. So, for example (last entry above) the Greek Letter PHI is 0x0398 - use that as the second parameter.
However, INI files are NOT unicode, so you cannot put a unicode character as the first parameter, so you will just type it's name.
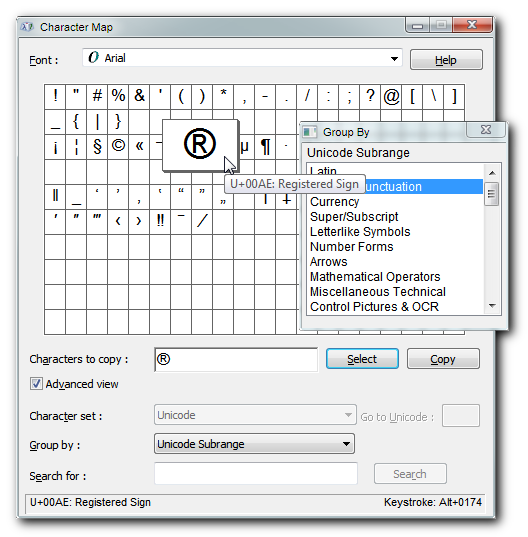
How to Get the Character Code from Charmap
You can choose whatever font you like - a good one is Arial, as it has most glyphs.
You can find what you want more easily by using the Group By selector, which will open the Group By popup.
Now, simply click on whatever glyph interests you.
Look at the status bar.
•If the character is an ANSI character, then you want to record the number in the Keystroke on the bottom left, and use that code for the glyph code.
•However, even if it is an ANSI character, there will still be a UNICODE number in the bottom left. You can use either one.
•If the character is UNICODE, there will not be a Keystroke number in the bottom left (at least that's how it is in Windows 7).
•If the character is a UNICODE character, you want to use that code, complete with the U+. (TextWorx will replace U+ with 0x) or you can do the replacement yourself.
•Therefore unicode character 00AE should be placed as the second parameter as either U+00AE or 0x00AE.